Showing posts with label tutorial. Show all posts

Saturday, May 18, 2019

Using contact sheets


Back in the old days, the film days, photographers used to shoot a roll of film, develop it, and then print a contact sheet so they could see what the images looked like and select the one or two they wanted to print.

Of course, today we can look at the images on the viewer on the back of the camera and decide whether or not to keep an image.  In fact, many cameras now allow you to crop and do quick edits right in the camera.  I suppose that might be ok if you didn't have much time, but I like to do the editing later when I have time to look at the images in more detail.  You can't really see the details on that 3 inch screen.

The contact sheet function is now available in many image catalog/editing programs such as Lightroom.  But I think there is value to taking a little more time to look at the images as a group and making your selections in the old fashioned way.

Here is a contact sheet I made up by just doing a screen capture of a portion of the Lightroom folder for this shoot.


These are not all the images I took from that session, but just a representative selection to illustrate my point.

By looking at a pseudo-contact sheet, I get a better sense of the slight variations of the different pose adjustments we made during the session.  Where a couple of poses seem identical, perhaps the expression on the model's face is better in one or the other, etc.  These things are surprisingly easy to spot when looking at the contact sheet.

Following the old school method, where the photographer or editor used a red wax pencil to mark the selected frames, you can do the same thing by using a red box.  Of course, you can print the sheet onto a standard 8.5 x 11 paper and do it just like the old guys, if you want to waste the ink.


You can approach this a couple of different ways.  First, you can just select the frames you want to work with by drawing a box around the whole frame.  Second, you can actually make initial crop decisions right on the contact sheet.  I think you should indicate the crop as soon as you see it, myself.  When you actually crop the image later, you can make adjustments.

So, nothing earth shaking here.  It's just a process to stimulate your vision as you analyze your shots.  It also helps you to see what is good and bad, because they are all displayed together and the better ones are more likely to show themselves quickly.

It's just another process.  Give it a try.

Find a catalog program that allows you to make initial selections - meaning you discard the shots that are out of focus, eyes shut, etc.  Then display them on the screen as a group.  Finally do a screen capture and then print it out on your standard printer and make your marks.  Then you will be ready for final editing.

It's fun!

Tuesday, March 19, 2019

Focusing attention


This is a shot of a street in New Orleans where people are out for a Sunday morning stroll.  I took this with an Olympus PEN E-P3 and 17mm/35mm lens.  It's just a typical street photo, nothing special, but it captures a slice of life in the Big Easy.

Well, the slice of life where people are not staggering around half-naked and throwing up everywhere, anyway.

I wanted to point out a couple of things in the composition that make this photo work (to whatever extent you think it works, that is).

NoLa is a colorful place, which is why I used the color version of the photo at the top of the post.  But to discuss composition, I want to switch to black and white so as not to be distracted by the colors.


So, here's the thing about this composition.  The leading lines are taking your eye down the street, like so:


BUT, you have the couple pushing the stroller in the foreground on the left of the frame, and they are interesting.  They are moving against the flow, so to speak.  They are walking toward the viewer, where everybody else is walking away.  Also, they are fighting against the leading lines in the photo. They are swimming upstream.

Look at the photo for a minute (one of the ones without my red markups) and think about where your eye is going.  Hopefully, you eye is moving around the photo, but there should be an axis where it stays most of the time.  I think it should be like this:


Your eye can't decide which is more interesting, the couple in the foreground that you can see clearly, or what is going on down the street, which is sort of at the limit of your ability to discern details.

And that indecision, that back and forth motion of the eye, that's what provides the tension and hopefully the interest in the photo that helps you feel the situation.  And, just to help it out a little we'll darken the upper left and lower right corners of the frame to force your eye more into that line of tension, like so:

Monday, March 18, 2019

Don't worry too much about sharpness


Henri Cartier-Bresson once said, "Sharpness is a bourgeois concept."

I don't think this is universally true, but it's certainly a valid concept for a host of typical photography subjects.

Think about paintings, for example.  While there are a few artists who do hyper-realistic paintings that are essentially indistinguishable from photographs, in general the thing that makes a painting so good is that it is a representation of reality, full of imperfections that taken as a whole communicate a feeling to the viewer.

That's important to keep in mind:  A photo, like a painting, consists of an arrangement of dots on a two-dimensional medium, and the 'image' is formed in your head.

Now, if you are shooting landscapes that are intended to be printed large for sale, you probably need a sharp image.  In some cases, portraits also need some sharpness, depending on exactly what you are trying to do. Plus, unless you are doing environmental portraits, the trend is to make only the eyes razor sharp, and let depth of field limit the sharpness of other parts of the face.

Just for the sake of documenting how a child looked in the past, and how they changed as they grew up, for example, you can take hundreds of photos and many of them will be sharp.  But for storytelling purposes, sharpness is not necessary.


This is a photo of my granddaughter.  This kid has more energy than any child I have ever seen.  As soon as she learned to walk, she was constantly in motion.  In fact, when she came to visit me, the first words out of her mouth would always be "Let's Run!", and off she would go, expecting me to chase her.  I wanted to take photos of her, but I could never catch her still enough to even get a photo.  This one, above, was pretty much my most successful attempt over a period of TWO YEARS.  And as you can clearly see, it's not sharp at all.  But I love it, because it completely represents her personality over those years.  She was happy, and in motion.  And here she is in a recent photo, playing with her sister.  Her games always involve running.


Remember, your photos tell a story and that story is about communicating inside the viewer's head.  Sharpness is not really required in most cases.


Friday, March 15, 2019

Looking for elements of composition


While strolling with my wife one evening, I came upon this scene.  At first, I was drawn to the repeated elements of the steps, and the placement of the couple.  I didn't want to be too obtrusive, so I just snapped the shot without taking too much time and moved on.  My thinking at the time was that the vertical composition would work with the steps going upward in the frame.  And while it was not a wonderful photo opportunity, I felt certain that something interesting was in there.  

So, I got back to do the post processing and at least straighten up the frame, etc.  But in the process I decided to crop out some extraneous dead space and such, so I switched to landscape orientation so I could emphasize the couple. 

And that's when a sort of magical thing happened.  I realized that there were additional compositional elements in the photo that I had, frankly, not noticed at first.  Here is my crop:


First of all, I like this much better because the crop has pulled the foreground couple closer and made them more of a focus.  But by doing that I noticed a happy accident in the background.


There are actually three couples arranged in a triangle on the right side of the frame.  Ok, I know my red markup looks more like Mickey Mouse head, but I was just pointing out the location of the three couples.  The steps work to direct the eye upward to the right, toward the couples.  So that was cool.  But from a balance standpoint, something else was there.


This guy.  Standing off the the left.  In this crop he is prominent enough to actually become a compositional element in two ways.  First, he works in opposition to the foreground couple on the right.  Imagine a balance with the fulcrum near the center of the frame, near the couple, and the guy off on the long arm of the balance.  They are 'heavy' on the lower right, but he is trying to balance the composition by being separated at a distance.  The long lever arm leaves the impression that he could weigh down the long arm and balance out the weight of the couple.

So, whatever, right?  It's kinda thin, I admit.  But still the balance of weights in a composition is important and provides another element of subliminal experience in the viewer.  But here is the most important compositional element in the storytelling sense:


On the right side of the frame are three couples, and on the left side is a single man.  Plus, there is something about the way he is standing there that also creates tension.  It's a place where couples go to stroll and sit and look at the streets of Rome, but he has no partner.  At a glance, you might not notice, but if you look at the photo for a minute, you begin to think about the back story possibilities, why is he alone, etc.  At least, that's what I do.


Tuesday, March 12, 2019

Saving a shot


Often you will find yourself in situations with bad lighting.  Noonday sun, for example, that over exposes everything and simultaneously creates impenetrable shadows.  Or night time scenes (which we will focus on specifically later).  Or building interiors.  Or dusk.  There are innumerable situations where your eye sees everything just fine, but the camera sensor, not so much.

But have heart, many of these situations are salvageable.  Take this shot for example.  It's a crop from a larger image, and although it is not in finished form, you can see possibilities.  But can you see the possibilities in the original image?


Hmmm.  It's a stretch.  This was an offhand street shot where the camera chose to meter on the sky, leaving everything else in almost total darkness.  Or so it seems.

But I have shot a lot with this camera (Olympus OMD EM5-II) and I know it has the ability to pull up useable images from the mud.  So when I looked at the viewfinder, I saw a nice sky and some illumination in the foreground, and I felt like I could save it.

The first thing I did was to adjust the exposure, which I could do pretty well since I shot the original in raw format.  Here is the result:


By adjusting the exposure in the foreground, I was able to save the sky and bring up details.

Next, I adjusted the crop.


That's pretty good.  Yeah, I know things are all angle-y, but she is pretty straight and because she is looking up to the right of the frame, you don't mind the tilt of the background so much.  Next, I brightened her up a little:

So, this seems ok, and maybe better than ok.  And I am thinking this is a keeper, but it does have some issues.  First of all, since it was getting dark, when I pulled up the exposure I pulled up a lot of noise with it.  At this size, you can't really see that, but if you blew up the image on the screen, it is obvious. Filtering out the noise softened the image so much that it was very noticeably smoothed, and the texture on the background structures was lost altogether.  So I scrapped that idea.

Instead, I used my patented trick for saving bad photos: IMTDT (I Meant To Do That).  I used this technique three ways, just to see what would happen.  Never be afraid to experiment with digital photos, just make sure you save your work early and often.

First, I altered the color grade and introduced MORE noise.


You probably don't notice the extra noise I introduced in this version, but on a larger scale it is definitely there.  It was designed to give a fashion treatment, but I thought it would work here.  And it does.  The addition of the noise provides a little magazine/print subtlety.  Not for everyone, but it works.

Next, I intentionally increased the contrast.


This treatment gives a very different, more dramatic effect.  But you lose the clouds.  Eh, can't have everything I suppose.  I like this version too, because of the increased contrast. It actually takes your mind off any noise issues.

And finally, I did my patented (just kidding) black and white conversion to see how that would work out.


This one, too, has extra noise thrown in to simulate film grain.  I can't say I like this one better than the others, but I do like it.  Notice how the addition of a little film grain has actually pulled up detail in her hair, which was blowing slightly in the evening breeze.  Makes it feel like there is a little motion in the image that I didn't feel in the other versions.

So, did I do anything worthwhile?  You decide.  Keep in mind that she was just standing there, overlooking the ruins of the Forum in Rome, and taking in all the historical significance.  And thinking, and wondering.  Which of the images conveys that emotion the best?

Monday, March 11, 2019

Being creative in cropping


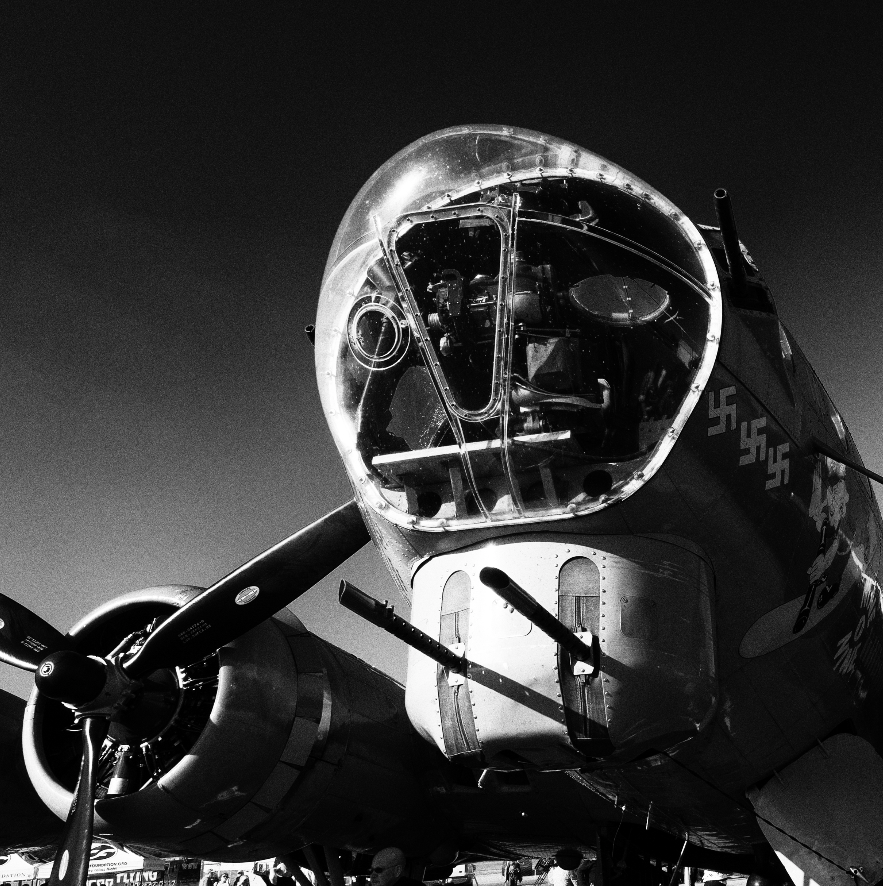
My father was a ball turret gunner in a B-17 bomber in WW2.  After he got out of the service, he got a private pilot license and flew around in a little Cessna until life caught up with him and he had family responsibilities to deal with.  He had some interesting adventures both in the service and afterwards in the small plane.  After he retired he decided that he would like to fly small planes again, but found out that his license had been pulled.  So he began to take lessons, intending to get the license back.  I was looking forward to going up in a plane with him, just the two of us.  I had always enjoyed listening to his exploits in the air, and it was something I really wanted to share with him.  I saw it as a thing that could connect the younger version of him to me.  It's not every day that you get that chance.  If you can't imagine what I am talking about, watch "Field of Dreams".

But, it turned out that he had a heart condition that would not allow them to grant his license, so he dropped the idea and I was really disappointed.  Eventually, after the death of my mother and a calamity of health issues, my father came to live with me.  He stayed the better part of six years, and we spent more time together than we had since I left home to go to college.  It was nice, and also trying at times.  But I always wanted to fly with my father.

About a year before he died, while he was staying with my sister in another state for a little while, I got a chance to go up in a B-17 that was visiting a local airport.  It was expensive, but I felt it was the only thread I could grab relating to my desire to share a common experience with my younger father.  And of course, I brought my camera along.  I took a lot of photos, but there were hundreds of people swarming around the aircraft and I could never get a clean shot.  So I did the next best thing - I took some shots that I thought I could clean up later.

The image at the top of the page is the raw shot I took, trying to get a Life Magazine angle of the dramatic front of the aircraft.  But as you can see, there are people wandering around all over the place, spoiling the image.  So I started judiciously cropping them out of existence...(diabolical laughter). Here is my first crop:


In one fell swoop I eliminated a serious foreground distraction on the right (that cluster of heads in front of the engine).  So I think this is going in the right direction, but I really can't get that guy in the shadow of the engine out of the frame easily.  I mean with editing in photoshop, for example.  It's not impossible, but it won't work well here.  So while this looks very much like what I envisioned for the photo, I decided to do another version that is cleaned up more by cropping.


This square crop takes care of the wayward wanderer in the foreground, but the square format has departed from my mental vision of something that looks like a Life Magazine cover.  So, I made one more crop just to focus on the bombardier area and the chin guns.


So, this crop restores the image format I was looking for, and focuses more on the turret and nose of the plane.  But I've lost the engine in the process, and that provided a little more context.  Ah, well, sometimes you just have to take what you can get.

But, there is another thing I can still do to restore my vision.  See, in the 1094s, there would not have been much if any color photography available, especially from the war.  So I decided to play with the black and white conversion.


In converting to black and white, I increased the contrast significantly and produced a very dramatic effect on the plexiglass nose of the plane, as well as some interesting shadows of the gun barrels.  As a somewhat unexpected side effect, the high contrast has almost removed the offending figure in the foreground, reducing him to a shadowy blob.  I think this one could have easily looked like a magazine cover from the 1940s.  Finally, I made the same square crop just to see what that would look like.


I like it.  I can definitely see this as part of a Life Magazine feature about the 8th Air Force in England, for example.  And it's exactly the sort of representation they would have wanted to portray:  The B-17 rules the sky.  It has power (the engine), sophistication (the bombardier's plexiglass nose position) and deadly punch (the gun turret).

So I am happy with my efforts here, because I was able to reproduce the image in my head.  I didn't process this in time for my Dad to see it, but I think he would have liked it.

Thursday, March 7, 2019

Photo Composition Fundamentals


Let's start with another Ansel Adams quote:

"There are no rules for good photographs.  There are only good photographs."

That's easy for Ansel Adams to say.  For the rest of us, there are definitely some rules we need to at least keep in mind, so our photographs will be better.

Elements of Composition

The difference between a boring snapshot and an interesting photograph is almost always the composition.  OK, sometimes it's also the subject, but I maintain that good composition can make even a boring subject more interesting.

So, what sorts of things comprise good composition?

Composition rule 1:  Symmetry is boring

We naturally gravitate, for some reason, toward symmetry.  At least, we do when we are not behaving as artists.  Symmetry seems to make us feel that everything is somehow in its right place, and so it must be perfect.  Therefore, we put our subjects in the center of the frame, and make sure the horizon is splitting the frame dead center, etc.  But such compositions are generally just not noteworthy, unless the geometric pattern is the subject, and then just maybe we can use symmetry.

Symmetry does not lend itself to tension in the image, and tension in the image is what creates interest.  We want items in the photo to create a war in the mind of the viewer, so that his/her eye is forced to wander around the scene we created.  So, we try to use odd numbers of objects, arrange them in non-symmetric positions in the frame, etc.  When we do that, we cause our attention to continuously search around the image.  And that action is what makes the image memorable.

Good composition can be sophisticated, but there are some easy rules of thumb to keep in mind when we compose a shot that will lead directly to better photos.

Composition rule 2: Rule of Thirds (RoT)

The image at the top of the page has superimposed upon it a framework illustrating the rule of thirds.  Simply put, you divide the frame both horizontally and vertically into thirds, and then place your center of interest at one of the intersection points.  In this case, I chose the focal point to be the grouping of three people walking and placed them off-center to the lower right.


So this grouping is placed in one of the rule of thirds intersection points.  Your eye is drawn there as a natural point of interest.  But that's not all that we have in this photo.


 We also have this natural point of interest down the street.  All the lines in the photo converge on this spot, and so your eye is directed there as well.  These are called leading lines and they are an important way to force the viewer to look where you want.

Notice that the point of interest is off center in the photo.  It's not precisely at one of the RoT intersections, but still it pulls you away from symmetry.  The horizon is probably in that plane, but you can't really see any horizon in the photo so that's not upsetting.  Overall, there is no real symmetry in the frame, even though there is sort of symmetry in the building structures.  But by placing them off center, we broke the symmetry and created the tension.


Looking at the photo again with the lines all removed, you can see how the two areas of interest pull your eye back and forth between them.  The leading lines pull your eye down the street to see what is in the distance, but the grouping of people in the foreground to the right pull your eye back to the front.  Here is the photo with no markings so you can see it better.


See, the leading lines are pulling you down the street, but the people walking near you keep demanding your attention.  So your eye jumps back and forth between those two point of interest.  And that jumping back and forth is what makes it interesting.  You, the viewer, had to participate.

The group of walkers accomplishes another purpose as well as creating visual tension.  They provide depth to the scene.  Without the walkers, the scene is distant and flat, but with the walkers, you have some foreground action that reminds your brain that there are different planes in the photo.

To be fair, I have cropped this image down from the original frame to turn it into a decent image.  The original looked like this:


This image breaks all the rules.  I intentionally was just shooting a wide shot down the street because I knew I could make something out of it later.  So I ignored the composition, mostly.  But as I discussed in earlier posts, that's the fun part for me.  Also, to be fair, the walkers were just dumb luck.  If they hadn't been there, I probably wouldn't have tried to save this shot.  And finally, I shot with the wrong lens, if I intended to get detail in the people at the far end of the street.  But this was the lens that was on the camera at the time, so you get what you get.  To quote my favorite kitschy artist Bob Ross, "We don't make mistakes, we just have happy accidents."

Wednesday, March 6, 2019

Summary of the basics


This is a photo of the Grand Canyon right after a snowstorm back in 2011.  Taken from the airplane window (obviously) using a mobile phone.  It's not relevant to our discussions at this point; I just ran across it and thought I would throw it in.  Because I like it.

I wanted to take a quick break to just summarize the important things in the previous posts before we start looking more at photo composition.  So, here is my summary:

Camera - Don't go crazy buying expensive gear until you learn how to use it.  And even then, you don't need to go crazy unless you plan to make a lot of money.  Actually, you may not need to do it then either.  I was discussing gear with a really good, professional wedding photographer, comparing his Nikon D5 to my D800, etc., and eventually we both sort of rolled our eyes at each other because we were nerding out.  He looked at me and said, "You know, the people who buy the photos can't tell the difference. They can't see what we see."  He is right.  Do your best and have fun.

If you can, do the following:

  • get a camera body that allows you to change lenses
  • also allows you to use manual settings for ISO, Aperture and Shutter Speed
  • shoots in raw format if possible, but that's not completely necessary 
A kit zoom lens is generally ok for most things and you probably have it anyway.  Later you can do something better if you like, but the kit zoom is sufficient.

Post Processing Program - All you really need here is a basic program.  Photoshop Elements costs $99 and will do everything you need.  Lightroom is used by a lot of professionals, and it's pretty handy, but it's also more expensive.  You can get a subscription to Photoshop and Lightroom together for $10 per month.  Learning curve on Photoshop is pretty steep but Lightroom is easier.  You will use this program to:
  • Crop photos
  • Straighten photos
  • Adjust color balance
  • Adjust exposure levels (or brightness)
  • Adjust color saturation 
Of course, the programs I mentioned above will do a lot more than the basics, but we'll slide into the more advanced areas later.

That's it.  You can spend more money, but there's really no need to.  Unless you are planning to shoot high-quality landscapes or do fashion photography, this is really all you need.

Thursday, February 28, 2019

Talking cameras


This is what I call my "walking around camera".  It's an Olympus PEN E-P3.  It has a 12 MP micro 4/3 sensor and several automatic settings as well as some built-in 'artistic' processing functions.  It has interchangeable lenses, with the one shown being a 17 mm f/2.8, which works out to a 35 mm focal length on the m4/3 system due to the crop factor.  Don't worry about what that means right now, but the 17mm to 34mm conversion is important.

Important features of this camera include:


  • It's small and lightweight.  It will almost fit in your pocket.
  • It has interchangeable lenses
  • It has a pop-up flash
  • It has ability to control shutter speed and aperture
  • ISO range is 200-12,800
  • You can get a 14-42 zoom lens (that's 28 - 85 essentially) pretty inexpensively
  • can shoot raw images in addition to jpg output
There are a lot of cameras in this range, and this one is pretty dated (I bought it in 2011 I think).  In fact, there are improved models of the PEN camera that are probably cheaper and more capable.  But I am not going to buy any of them because this one does everything I need without being very obtrusive.  

If you want to see how well a camera like this works, check out this album on my Flickr site.

You don't need this specific camera, of course.  It's just an example.  But if you want to really be able to exert some control over your photography from the camera side, you need:

Ability to control the shutter and aperture yourself, either fully manually or at aperture priority or shutter priority.  Here's why:  if you set the camera on the P (program) mode, which will actually give you good results in many situations.  But the camera will decide an appropriate combination of ISO, shutter and aperture settings for a generic pleasing result.  That won't allow you to capture quick movement, such as people walking by or sports, etc. - for that you need fast shutter speeds.  It won't allow you to blur the background - for that you need a large aperture.  

My recommended settings for most photos:  Aperture priority, auto ISO.  In this setting you choose the aperture, which controls the depth of field (blurriness of the background) and the camera provides a reasonable combination of shutter speed and ISO to give you the least noise in the shot.  If it starts to get dark, then go to manual and make your own decisions.  A news editor once told me to not worry about noise, because post processing programs can minimize that.  Just make sure you get enough light on the exposure.  In most cases this is a good rule of thumb.


Ability to change the lens focal length, either through zoom or changing lenses.  As in film, you get better resolution if you don't crop too much.  So thinking ahead, you should use a lens that fills your frame mostly with the shot you want to get.  I always go a little wider so I can crop to straighten the frame or whatever.  The most convenient way to do this is through a zoom lens.  But, zooms are slightly lower in quality to a fixed lens most of the time, and they sacrifice aperture to get the zoom action.  Kit lenses (lenses that come with a camera) are almost always a medium wide to medium telephoto zoom, because it's the most versatile.  They will work most of the time.  Kit zooms usually add a couple of hundred dollars to the price of the camera, and often come in a bundle.  On the other hand, a really good say, 28-80 f/2.8 zoom will cost more than the camera body, in all likelihood.  

If you don't use a zoom, you will need a wide angle lens (24, 28, 35 mm equivalent), a 'normal' lens (about 50mm), and an intermediate telephoto (135mm to maybe 200mm equivalent, unless you want to do nature photography like birds, where you need something really long like a 400mm or 600mm).  The good news is, these lenses are individually much cheaper than 'good' zooms and work better as well.  The bad news is, you need multiple lenses, so the cost factor may offset.

My lens recommendation: Start with the kit zoom and as you gain experience either move up to a better zoom or start collecting fixed lenses that suit your subjects.

I am really a Nikon guy, so for advanced amateurs I recommend something on the order of a D7500 or something in that range.  There are also some good cameras in the D3500 range.  In fact, if you look on Amazon, for example here, you can get a complete D3500 kit with everything you need for about $400.  

It's a good place to start. 

Next time we will talk about how to set up the camera to take different types of photos.


Saturday, February 23, 2019

What you need for better photography

Let me start off by admitting that I have lots of nice and expensive photography equipment.  But let me follow that up with saying that many of what I consider my best photos were not made with it.  Here is an example of one of the most important pieces of equipment you need to make good photographs.


Yes, that's right.  Not a camera, but your eyes.  And the other major, indispensable piece of equipment you need is your brain.  That's because a good photo is a thoughtful photo.  You see it first in your head, and then use your eyes to control the camera to do your best to capture the scene you first imagined.  Ansel Adams, the famous landscape photographer, said that his photographs were an attempt to recreate the impression he had felt when looking at a scene, and not meant to document the specific details. So this leads us to Better Photography Rule No. 1:

Rule 1:  See it before you take it.

My wife takes really good photos...with her phone.  But it wasn't always so.  Early on, she just used it like an Instamatic to get snaps of places or children or other family members.  You know, the normal things.  And the photos were often tilted at an angle, people randomly placed in the frame, etc.  She was always wondering why my shots of the same things were better than hers.  So I told her: pay attention.  Think about what you are doing, and set it up in an interesting way when you take the shot.  She is not a techie by any means, but she got really good at taking photos with her phone.  And it was all because she slowed down just a little and put more thought into the shots.  She just learned to pay attention, which is Good Photography Rule No. 2:

Rule 2:  Pay attention.

Most people don't realize that what they actually see through a camera viewfinder is not what they think they see.  That's because we instinctively interpret the scene when we view it.  It goes back to that Ansel Adams quote above.  We are seeing our interpretation, not the reality.  So when you take a photo, stop and pay attention to what is actually in the viewfinder and think about how you can best set up the image.  Imagine that you are trying to communicate the situation to somebody who was not there with you.

Next time I'll write a little about actual equipment.

Friday, February 22, 2019

You can be a good photographer.


I've been taking, or rather making, photographs for a long time.  Since I was in high school, actually.  I am by profession a high tech kinda guy, but I have also been a journalist and found that to be very satisfying.  I gravitate toward journalistic photography.  I am a semi-pro, meaning I get paid for my work but I don't try to use it as my sole source of income.  I have written articles and provided photographs for newspapers and magazines, and photographed college sports for the NCAA.  I'm not saying I am the world's best anything, but I've learned a lot over the years and applied what I learned to make myself better.  Almost everybody has a digital camera these days, even if just in their phones, and I decided to write this blog to help others improve their skills in a simple way that anybody can understand.

I started out with a Nikkormat 35mm camera with a 50mm f/2 lens.  I shot Kodak Tri-X black and white film, and also whatever color film was available at the time.  I really liked Kodachrome and Ektachrome slide films, particularly when you underexposed them a little.  For portraits I liked Kodak Vericolor.  Yes, most people reading this will be laughing at taking photos with actual film, but hey, I admit I'm a geezer.  Imagine being limited to ISO 400.

Being a broke college student, I could not afford good glass, but I was able to eventually outfit myself with some inexpensive wide angle and telephoto lenses.  Everything was manual in those days, although I did have built-in light meters.  But having to manage all the settings was a really good way to (1) waste a lot of film, and (2) really understand how the camera/film/lens combination works.  There's no substitute for going manual to teach yourself.

Eventually digital cameras got good enough and inexpensive enough (relatively speaking) that I moved into digital photography.  I have to say, the modern cameras make taking photos so easy that pretty much anybody can, with a little patience, make some really good photographs.

Now, I am going to be sacrilegious for a moment and say that there are a lot of good photographers out there who augment their incomes by teaching classes, holding seminars, and getting paid to generally teach people a bunch of hooey.  The fact is, photography, like most art, is a subjective endeavor, and each person has his/her own tastes.  There are a few basics you need to know to improve your photography and change your snapshots into photographs.  These things are easy, but you need to practice them.

And that is what this blog is about.  I am going to show you examples of the photographs that I make, and tell you how I made them.  You don't have to like my work, but you should at least try to understand the thought process, so that you can apply it to your own photography.  I guarantee you will get better.

Now, let's talk about the photo I posted at the top of the blog.  Here is the straight out of the camera (SOOC) shot, just reduced in size to fit the blog requirements:


This was taken with an Olympus OMD EM5-II camera with a pretty good wide zoom lens.  I use this setup when I travel because it's small and light and unobtrusive.  The shot is pretty boring SOOC, although I did manage to blur the background and get a decent exposure.  But otherwise it is all very meh.  In particular, the placement of the center of attention, the woman with the camera, is dead center in the frame and I don't find this appealing. When I shoot the street, I am looking for a situation, and I use the camera to get an image that I can work on later.  So I cropped it thusly:


Ah, this looks much better to me.  The woman is now just a little off center in the frame, but the crop has enlarged the grouping of the man and woman and the grouping is very off-center.  But more importantly, I think the snapshot I took has taken a step toward a story.  The significance of the woman has changed.  She is more separated from the background, and now you are wondering what she is looking at.  And that's mainly because the crop made her larger and pulled her closer to the viewer.  It has also removed some extraneous clutter from the background and corrected the composition mistake I made in not getting anything below her knees into the frame.  By cropping in, you no longer really care about that.  Actually, that wasn't a mistake so much as just one of those things that happens when you do street photography.  You often just get what you get.  The next instant after this shot was taken, she moved and there was no longer any reason to take a photo.

Another thing I wanted to point out here is more subtle.  The woman is looking off the frame to the right.  From a storytelling perspective, we need to put some space in front of her to emphasize the distance.  So the crop does that as well, creating the implied distance.

Now, go back and look at the black and white version I posted at the top.  In the color versions, the colors are mostly muted and not distracting, so it works.  But in general, I have found that a black and white treatment of people shots helps you focus on the story by removing the distraction of colorful clothing.  Famous Canadian photographer Ted Grant once said,  "When you photograph people in color, you photograph their clothes.  But when you photograph people in black and white, you photograph their souls!"

I don't know if I would go that far, but certainly it focuses attention differently.  I think this may be due in part to a hundred years of black and white photojournalism.  We are are wired to view black and white shots such as this in the context of a news story, and some times an art gallery.

So, next blog I will talk a little about what goes into making a good photograph.  Spoiler alert: it's not about the camera.