Showing posts with label camera. Show all posts

Monday, March 4, 2019

Processing your images


You don't really have to do anything to your photos after you take them, but you're probably going to want to process them a little.  Images straight out of the camera can be a bit lifeless, and a little adjustment to color balance, contrast and sharpening will improve them immensely.  Of course, you can go way beyond simple corrections and enhancements and achieve some truly spectacular results if you want.  So let's dive in and see what we need.

Basic adjustments

The image in your digital camera in it's purest form looks something like this:

10111001010011010001010101000101110101001010101010......etc.

The image sensor is made up of a LOT (i.e., millions) of tiny light sensitive spots, which, without getting into the physics of it, produce a tiny electrical charge in a memory unit.  The amount of charge is sort of proportional to the amount of light that was falling on each spot when the shutter was open.  When the shutter closes, all the little charges from each spot are 'read out', with each reporting its charge value before resetting itself to zero.  The computer in your camera collects all of these reports and puts them in a file with information as to what part of the image each spot came from.  Now, the light at this point has no color, just a value representing quantity.  So they actually arrange these spots in groupings so they can put tiny color filters over each spot in the group, one for red, one for green, etc.  Now, each spot within a group is reporting out a light value in the red, green, etc., so you get a representation of color.  The groups of spots are called 'pixels', so if you have a 10 megapixel sensor, for example, you actually have at least 40 million of these little light spots (because a pixel generally contains 4 light spots).  The lens on your camera projects an image on the sensor, and all the pixels record the image and report it out as a digital file.  The digital file is then converted to an actual image to be displayed on you computer screen (through a sort of reverse process as what we described above) and you see a representation of the original scene.

But these images are interpretations and suffer from a variety of flaws.  Fortunately, you can make some adjustments and remove those flaws, so your photos will be more interesting and pleasing.

Assuming the exposure is correct, most photos would benefit from adjustment of the following factors in the image:

1.  Contrast
2.  Color balance
3.  Sharpness
4.  Saturation

Let's talk about each of them in turn.

Contrast - Contrast in an image is the difference between light and dark areas, basically.

As you can see, the image on the left, which is the raw file from the camera, is washed out looking, compared to the same image on the right, which has been boosted in contrast.  Pretty much every image you take, unless your camera is automatically boosting the contrast for you, needs some contrast boost.  It makes the colors pop more, and adds a little more drama and clarity.

Color balance - So, I probably should have talked about this one first, because it is really more fundamental.  Color balance refers to the interpretation of the sensor to different kinds of like.  For example, a tungsten light bulb puts out a very yellowish light, whereas a fluorescent bulb puts out a very bluish light.  Sunlight in midday has a certain color cast, but just before sundown it changes to more golden due to the filtering effects of the atmosphere. The flash light on your camera has its own color cast. And there are many other different types of light that might be present in your image.  Each type of light will produce a slight color cast to the image, making it look different from reality (at least the reality in your head).  But you can fix this by adjusting the color balance of the image.


In the image above, you can see the effect of different color balance values on the same image.  This was inside a church where there was a combination of daylight and tungsten light.  I made adjustments to the color balance to obtain a pleasing result.

If you set your camera's color balance to 'auto' it will do a pretty good job of making everything look like it was shot in daylight, which is a generally acceptable choice most of the time.

Sharpness - The perceived sharpness of an image is generally the result of what we call 'micro-contrast'.  In your eye, the light receptors have little branches in their neurons that reach out to the other light receptors nearest them, and when light falls on one receptor, it automatically tries to suppress the output of its nearest neighbors.  That creates micro-contrast, and it's purpose is to better define the boundaries of the different parts of the image.  In other words, it enhances edges.  And that's what we do in our digital images.

The different parts of the scene that are imaged onto the sensor can be a bit ill-defined, especially if we are using bad lenses that produce blurry images, or we are slightly out of focus producing blurry images, or there was too little light for the sensor producing blurry images, or whatever else happens to produce blurry images.  By adjusting the sharpness, we can create along the edges of elements in the image, increased micro-contrast that is perceived as sharpness.  Almost every image needs some of this, but not too much.  If you over-sharpen the image you will get a halo effect around things that is very annoying.  You can see the effects of sharpening in the comparison below.  But you have to look closely t the details of the woman's glasses, etc, at this scale.
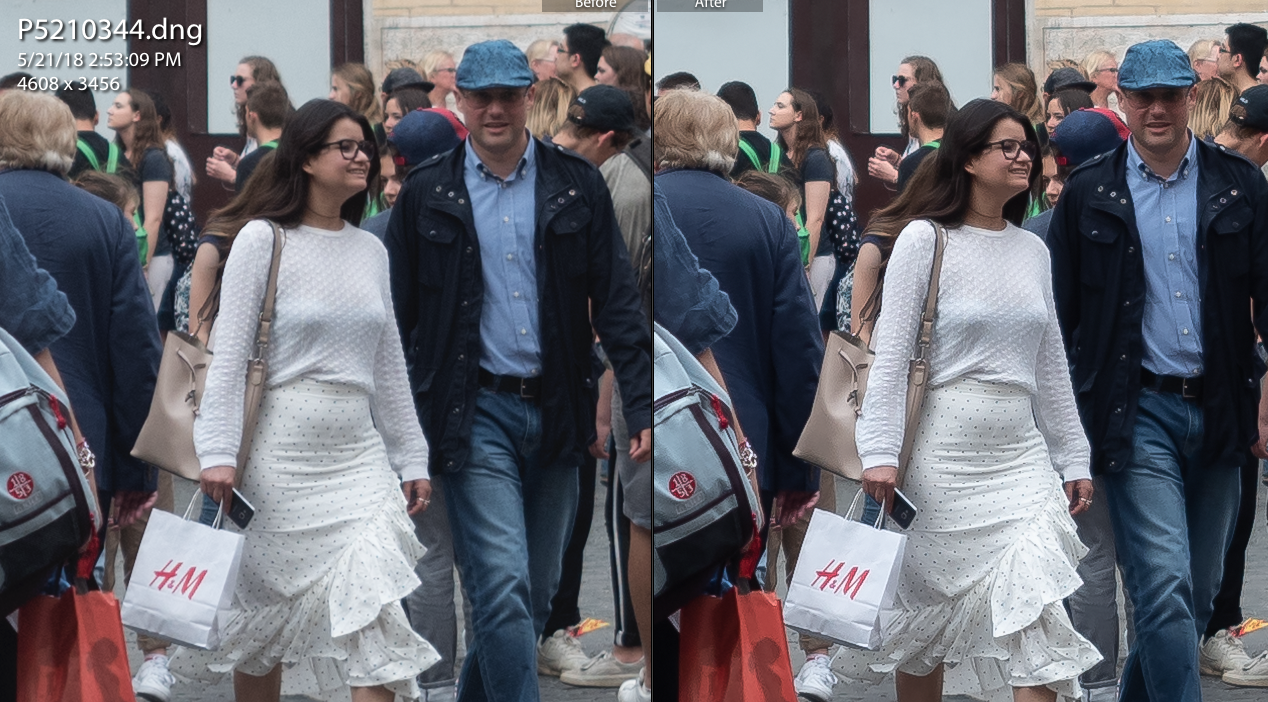


Saturation - Saturation is best described as the intensity or depth of the colors in an image.  When we take landscape photos of the leaves on the mountains in the fall, for example, we are often disappointed that the camera did not capture the true colors as we remember them.  Part of the reason for this is that we remember them better than they actually looked, because we have brains that tell us things that are not true all the time.  But we still want our photos to represent the image in our heads.  Cranking up the saturation a little will help with that perception.  Here is a comparison:


Shooting in raw format - Raw format is the (mostly) unprocessed digital image file coming out of the camera.  It contains all the image information.  If you allow your camera to pre-process your images into compressed files (jpg, for example) it will do all sorts of things to them according to the people who programmed it.  If you shoot in raw mode, you have the freedom to make the adjustments yourself.  You can make additional adjustments to the jpg files, but your choices and controls are more limited.  However, most jpg files are just fine because the people who programmed your camera made sure of that.

This is getting a bit long, so we will take up more topics related to post processing next time.  But before I close, take a look at the image at the top of the page.  I exposed the image to make the sky look good, knowing that the shadow areas would be too dark.  But I used some processing to bring out the shadow areas and get the best of both worlds.

Friday, March 1, 2019

The best setup for your camera


If you are going to be even half-serious about making photographs, you need to learn how to use your camera.

Cameras today are loaded with a lot of options for doing things I would never think of doing.  I know some pros who have programmed all their controls to do things they do repeatedly when shooting weddings or sports for example, but I shoot weddings and sports and I don't do any of those things.  But then again, I'm not trying to make a living with photography, so I don't need to process images as quickly as they do.

So anyway, let's focus on the basic controls you need to master so you can turn your camera into an extension of your brain and focus on the image and not the camera.

Set the camera to Aperture priority.  For most shooting, I want to control the depth of field, meaning the amount of blur in the background of my shots.  Having a sharp foreground/subject with a blurry background makes a very pleasing portrait (we'll talk specifically about portraits later).  In order to get such a photo, I need to set the aperture to a large opening, like f/2.8 for example.

Note on aperture settings:  They seem backwards.  A large aperture number, such as f/22, is a small opening, while a large opening is a small number, like f/2.8.  I'm not going to get into the detailed optical explanations for this stuff unless somebody asks a specific question, but suffice it to say that if I want blur in the background, I want a setting such as f/2.8, and if I want lots of stuff at different distances to all be in focus at the same time, I want a setting such as f/16 or higher.  Take some photos with different settings and develop an understanding of how this works so you don't have to think about it later.

What about shutter priority?  Well, what about it?  haha.  Sometimes when you expect to be shooting things that move fast, such as sports or grandchildren, you need to freeze the motion.  For that, you may need to switch to shutter priority and just live with the depth of field you get when the camera program selects the aperture setting.  You should generally set the shutter speed to twice the focal length of the lens you are using.  For example, if you are shooting with a wide angle lens, like say a 28mm, you really only need a shutter speed of about 1/60 or maybe 1/100.  That's because the image details in the frame are very small, and if there is any blue due to normal motion you won't see it.  On the other hand, if you are using a 200mm telephoto to shoot birds, I mean, photograph birds, you will need a faster shutter speed such as 400 or even 1000 depending on the situation, because the motion will be magnified with the image.

Set the ISO to auto.  Just do it.  ISO, shutter speed, and aperture together control how much light is used or available to record your image.  The higher the ISO number, the more sensitive the process and therefore the less light it will take to record the image.  However, due to some complicated physics of semiconductors that, again, I will not try to explain unless you specifically ask, the higher the ISO the more noise you get in the resulting image.  So this is all a balancing act between ISO, aperture and shutter settings to get the best image properties.  In most cameras, you can set ISO to auto and then specific the highest value the camera will ever allow, such as 12,800 for example.  You can decide for yourself how much noice you will allow into the photo and set the upper ISO limit to your liking.

A note on noise.  Don't be too afraid of some noise in your photos.  Most of the image processing programs can remove a lot of it, and some of it doesn't hurt anyway, depending on what you are shooting.  And, a cool trick with noise is this:  If the image is too noisy, convert it to black and white.  For some reason we don't seem to mind noise in black and white images, and in fact we often ADD noise to them.  I think we are trying to emulate old black and white film which was shot at ISO 400 and then sometimes push processed to get more sensitivity through development.  That made grainy photos we usually saw in the newspaper.  So we think it's normal.

A final note on settings.  It's great to play with your camera and see what you can make it do.  But when you are out on a picnic with the family, just set it on program mode (P) and enjoy capturing the fun of the day through your images.  Blur means movement, and sometimes that's ok.  Noise is ok.  It's all good.  Have fun.  Here's a shot of my granddaughter at 6 playing with her 4 year old sister. They are never still.  This perfectly captures her mood and her life, and look how happy she is.   This is the essence of her, and every time I look at the photo I remember her as happy and carefree. And that's what it's all about.


Thursday, February 28, 2019

Talking cameras


This is what I call my "walking around camera".  It's an Olympus PEN E-P3.  It has a 12 MP micro 4/3 sensor and several automatic settings as well as some built-in 'artistic' processing functions.  It has interchangeable lenses, with the one shown being a 17 mm f/2.8, which works out to a 35 mm focal length on the m4/3 system due to the crop factor.  Don't worry about what that means right now, but the 17mm to 34mm conversion is important.

Important features of this camera include:


  • It's small and lightweight.  It will almost fit in your pocket.
  • It has interchangeable lenses
  • It has a pop-up flash
  • It has ability to control shutter speed and aperture
  • ISO range is 200-12,800
  • You can get a 14-42 zoom lens (that's 28 - 85 essentially) pretty inexpensively
  • can shoot raw images in addition to jpg output
There are a lot of cameras in this range, and this one is pretty dated (I bought it in 2011 I think).  In fact, there are improved models of the PEN camera that are probably cheaper and more capable.  But I am not going to buy any of them because this one does everything I need without being very obtrusive.  

If you want to see how well a camera like this works, check out this album on my Flickr site.

You don't need this specific camera, of course.  It's just an example.  But if you want to really be able to exert some control over your photography from the camera side, you need:

Ability to control the shutter and aperture yourself, either fully manually or at aperture priority or shutter priority.  Here's why:  if you set the camera on the P (program) mode, which will actually give you good results in many situations.  But the camera will decide an appropriate combination of ISO, shutter and aperture settings for a generic pleasing result.  That won't allow you to capture quick movement, such as people walking by or sports, etc. - for that you need fast shutter speeds.  It won't allow you to blur the background - for that you need a large aperture.  

My recommended settings for most photos:  Aperture priority, auto ISO.  In this setting you choose the aperture, which controls the depth of field (blurriness of the background) and the camera provides a reasonable combination of shutter speed and ISO to give you the least noise in the shot.  If it starts to get dark, then go to manual and make your own decisions.  A news editor once told me to not worry about noise, because post processing programs can minimize that.  Just make sure you get enough light on the exposure.  In most cases this is a good rule of thumb.


Ability to change the lens focal length, either through zoom or changing lenses.  As in film, you get better resolution if you don't crop too much.  So thinking ahead, you should use a lens that fills your frame mostly with the shot you want to get.  I always go a little wider so I can crop to straighten the frame or whatever.  The most convenient way to do this is through a zoom lens.  But, zooms are slightly lower in quality to a fixed lens most of the time, and they sacrifice aperture to get the zoom action.  Kit lenses (lenses that come with a camera) are almost always a medium wide to medium telephoto zoom, because it's the most versatile.  They will work most of the time.  Kit zooms usually add a couple of hundred dollars to the price of the camera, and often come in a bundle.  On the other hand, a really good say, 28-80 f/2.8 zoom will cost more than the camera body, in all likelihood.  

If you don't use a zoom, you will need a wide angle lens (24, 28, 35 mm equivalent), a 'normal' lens (about 50mm), and an intermediate telephoto (135mm to maybe 200mm equivalent, unless you want to do nature photography like birds, where you need something really long like a 400mm or 600mm).  The good news is, these lenses are individually much cheaper than 'good' zooms and work better as well.  The bad news is, you need multiple lenses, so the cost factor may offset.

My lens recommendation: Start with the kit zoom and as you gain experience either move up to a better zoom or start collecting fixed lenses that suit your subjects.

I am really a Nikon guy, so for advanced amateurs I recommend something on the order of a D7500 or something in that range.  There are also some good cameras in the D3500 range.  In fact, if you look on Amazon, for example here, you can get a complete D3500 kit with everything you need for about $400.  

It's a good place to start. 

Next time we will talk about how to set up the camera to take different types of photos.