You don't really have to do anything to your photos after you take them, but you're probably going to want to process them a little. Images straight out of the camera can be a bit lifeless, and a little adjustment to color balance, contrast and sharpening will improve them immensely. Of course, you can go way beyond simple corrections and enhancements and achieve some truly spectacular results if you want. So let's dive in and see what we need.
Basic adjustments
The image in your digital camera in it's purest form looks something like this:
10111001010011010001010101000101110101001010101010......etc.
The image sensor is made up of a LOT (i.e., millions) of tiny light sensitive spots, which, without getting into the physics of it, produce a tiny electrical charge in a memory unit. The amount of charge is sort of proportional to the amount of light that was falling on each spot when the shutter was open. When the shutter closes, all the little charges from each spot are 'read out', with each reporting its charge value before resetting itself to zero. The computer in your camera collects all of these reports and puts them in a file with information as to what part of the image each spot came from. Now, the light at this point has no color, just a value representing quantity. So they actually arrange these spots in groupings so they can put tiny color filters over each spot in the group, one for red, one for green, etc. Now, each spot within a group is reporting out a light value in the red, green, etc., so you get a representation of color. The groups of spots are called 'pixels', so if you have a 10 megapixel sensor, for example, you actually have at least 40 million of these little light spots (because a pixel generally contains 4 light spots). The lens on your camera projects an image on the sensor, and all the pixels record the image and report it out as a digital file. The digital file is then converted to an actual image to be displayed on you computer screen (through a sort of reverse process as what we described above) and you see a representation of the original scene.
But these images are interpretations and suffer from a variety of flaws. Fortunately, you can make some adjustments and remove those flaws, so your photos will be more interesting and pleasing.
Assuming the exposure is correct, most photos would benefit from adjustment of the following factors in the image:
1. Contrast
2. Color balance
3. Sharpness
4. Saturation
Let's talk about each of them in turn.
Contrast - Contrast in an image is the difference between light and dark areas, basically.
As you can see, the image on the left, which is the raw file from the camera, is washed out looking, compared to the same image on the right, which has been boosted in contrast. Pretty much every image you take, unless your camera is automatically boosting the contrast for you, needs some contrast boost. It makes the colors pop more, and adds a little more drama and clarity.
Color balance - So, I probably should have talked about this one first, because it is really more fundamental. Color balance refers to the interpretation of the sensor to different kinds of like. For example, a tungsten light bulb puts out a very yellowish light, whereas a fluorescent bulb puts out a very bluish light. Sunlight in midday has a certain color cast, but just before sundown it changes to more golden due to the filtering effects of the atmosphere. The flash light on your camera has its own color cast. And there are many other different types of light that might be present in your image. Each type of light will produce a slight color cast to the image, making it look different from reality (at least the reality in your head). But you can fix this by adjusting the color balance of the image.

In the image above, you can see the effect of different color balance values on the same image. This was inside a church where there was a combination of daylight and tungsten light. I made adjustments to the color balance to obtain a pleasing result.
If you set your camera's color balance to 'auto' it will do a pretty good job of making everything look like it was shot in daylight, which is a generally acceptable choice most of the time.
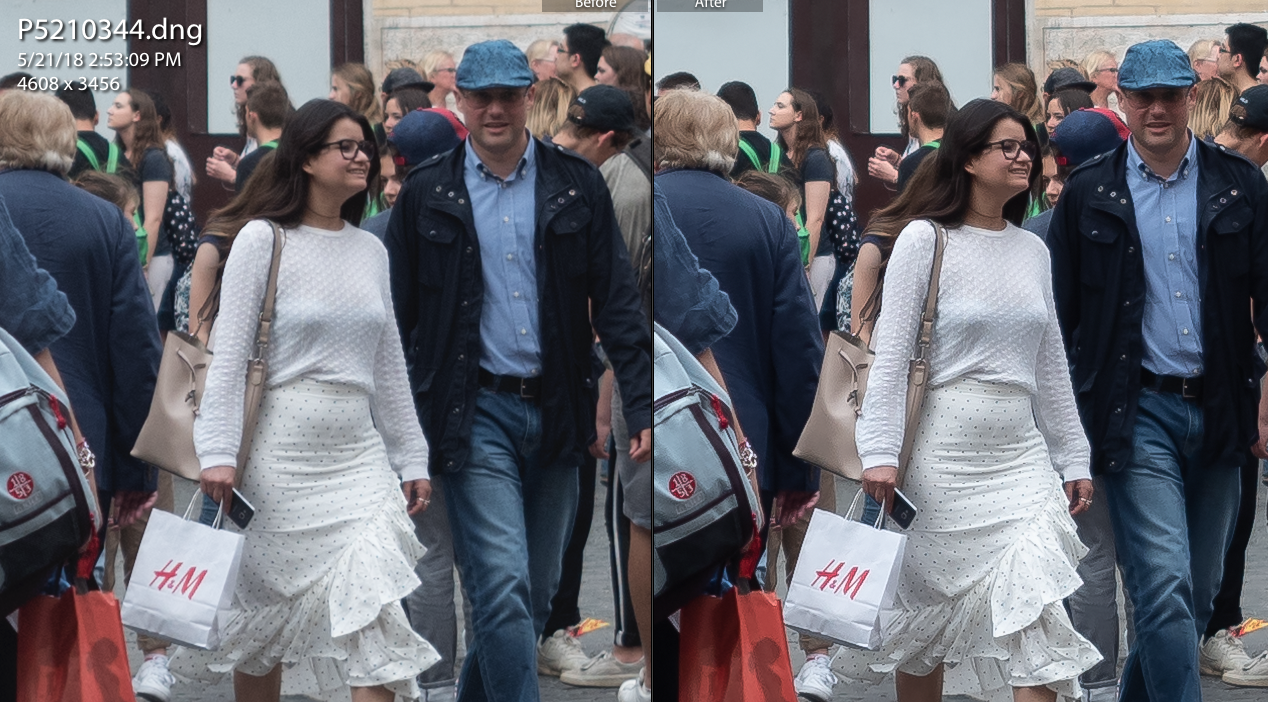
Sharpness - The perceived sharpness of an image is generally the result of what we call 'micro-contrast'. In your eye, the light receptors have little branches in their neurons that reach out to the other light receptors nearest them, and when light falls on one receptor, it automatically tries to suppress the output of its nearest neighbors. That creates micro-contrast, and it's purpose is to better define the boundaries of the different parts of the image. In other words, it enhances edges. And that's what we do in our digital images.
The different parts of the scene that are imaged onto the sensor can be a bit ill-defined, especially if we are using bad lenses that produce blurry images, or we are slightly out of focus producing blurry images, or there was too little light for the sensor producing blurry images, or whatever else happens to produce blurry images. By adjusting the sharpness, we can create along the edges of elements in the image, increased micro-contrast that is perceived as sharpness. Almost every image needs some of this, but not too much. If you over-sharpen the image you will get a halo effect around things that is very annoying. You can see the effects of sharpening in the comparison below. But you have to look closely t the details of the woman's glasses, etc, at this scale.
Saturation - Saturation is best described as the intensity or depth of the colors in an image. When we take landscape photos of the leaves on the mountains in the fall, for example, we are often disappointed that the camera did not capture the true colors as we remember them. Part of the reason for this is that we remember them better than they actually looked, because we have brains that tell us things that are not true all the time. But we still want our photos to represent the image in our heads. Cranking up the saturation a little will help with that perception. Here is a comparison:
Shooting in raw format - Raw format is the (mostly) unprocessed digital image file coming out of the camera. It contains all the image information. If you allow your camera to pre-process your images into compressed files (jpg, for example) it will do all sorts of things to them according to the people who programmed it. If you shoot in raw mode, you have the freedom to make the adjustments yourself. You can make additional adjustments to the jpg files, but your choices and controls are more limited. However, most jpg files are just fine because the people who programmed your camera made sure of that.
This is getting a bit long, so we will take up more topics related to post processing next time. But before I close, take a look at the image at the top of the page. I exposed the image to make the sky look good, knowing that the shadow areas would be too dark. But I used some processing to bring out the shadow areas and get the best of both worlds.